Have you ever found yourself so close to a subject to cant fit it in? Or find yourself with a fantastic scene before you having left your wide-angle lens at home and all you have is your long telephoto lens? Or further more have your wide-angle lens with you but the subject would just be too small in the frame or the image would need some major cropping and result in loosing valuable pixels to create the panorama or composite you have in your mind?
If you answered yes to any of the above questions, then shooting composites may be the solution for you. In the below post I will talk you through some easy steps on how to shoot composites for yourself. You will be shocked at how easy this is. You don’t need any special skills or talents. You don’t need any expensive photography equipment. All you need is the persistence to learn and perfect a technique.
• When you have a scene in front of you that you think may work well as a composite. First activate your camera grid in the viewfinder. By activating your camera grid, you will be able to see grids of lines running horizontally and vertically across your camera’s viewfinder. You can use the camera grid to align against a specific landmark in the scene (e.g. the horizon) You will use these lines as a guide to help you to judge the level of the scene so that the alignment remains consistent across the series of pictures you will be taking for your composite.
Tip: Some DSLR cameras have a built in virtual horizon option that can be activated from your cameras menu and will display in the same manner as a spirit level either in your view finder or on your LCD
• One of the most important elements of capturing a composite is to maintain a realistic depth of field. Now there are two different methods I use to do this and which one I choose depends on the type of composite I am shooting, the two most popular situations you may find your self in when shooting wildlife composites would be:
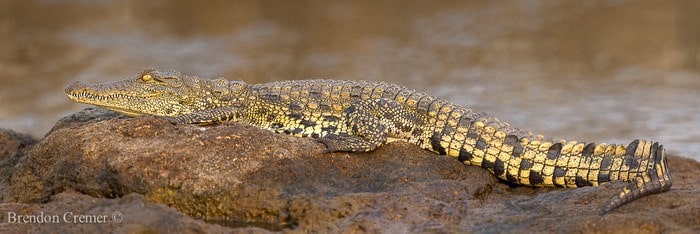
1. Shooting a series of images of a close up animal in order to fit the entire animal in the end result. 2. Shooting a series of images of an animal or group of animals and including some environment to create an animal in environment image in the end result
Each one of these situations would require a slightly different approach and focusing technique, I will start with the first situation.
The most important factor is gauging at what angle the animal is lying in relation to you, for example 90 degrees to you so directly horizontal or at a slight angle like 45 degrees. The easier of these two is if the animal is at 90 degrees or directly horizontal to you, in which case you can focus and shoot as normal for every image ensuring you focus on the animals body and you allow enough of an overlap, in these cases I will often overlap as much as 50%
If the animal is at a slight angle to you things get a little trickier. If you were to focus along the body for every image you would probably find that you have areas of soft focus in various spots in the image and a depth of field that is a little unrealistic. So the technique I use is to focus on and shoot the areas of most importance, in most forms of wildlife photography this would be the face, eye or head of the animal. So to get theses areas of most importance I would shoot my first shot with focus on the eye as always then move across for the next image with at least a 50% if not more overlap and shoot a second image with focus just behind the head, this would result in the eyes, face, head, and neck to be in focus. After the second shot I would then lock my focus and keep it locked while I shoot the rest of the images, as I want them. In the finished image this would result in a more realistic depth of field.
The second situation is the easiest of all. Because your subject will be a little distance from you, you should only need one image to include it and that image should capture it completely in focus with a good depth of field, once you have captured this image lock your focus on the subject, keep it locked and then continuing to capture the rest of the scene.
• You movement and transition from one image to another is also very important. Once you have taken the first picture, pivot your upper body slightly to the left or right, remember to use the virtual horizon or gridlines to ensure you are on the same level. While pivoting, keep your arm firmly against your body and your hand should try to hold your camera as still as possible. Take the second picture, making sure that it overlaps the first picture by a minimum of 25%. Continue taking pictures in this way until you reach the other end of the scene you wish to take.
• Preview your pictures that you have taken. Check that the pictures are aligned properly as you go over them. You can use the horizon as guidance. You do not have to be perfect. A slight misalignment between the pictures is okay as it will not be noticeable in the finished image.
• Download your pictures to an editing software (I use Adobe Lightroom 4)
There you have it! Being able to take panoramic pictures is not as difficult as it may seem to be. Give it a try, and you will be amazed at how easy this is.
Brendon Cremer
Brendon is an adventurer, conservationist, tour leader, specialist wildlife photographer and guide based in Nelspruit, South Africa. Brendon Guides and hosts photographic safaris around Southern and East Africa. Brendon has a deep respect and understanding for Africa and its wildlife and through this profound knowledge, Brendon’s photo safaris allow the traveller not only to enhance their photography, but also gain a lifelong admiration for Africa’s wildlife and culture.
- Web |
- More Posts(3)
Leave a Reply